
Before we start
So, you want to learn how to mix techno tracks like a pro? The easiest way would be to get a time machine, travel back in time to find your younger self and teach them everything there is to know about mixing. But until those are invented, the next best thing is to learn the old-fashioned way. And in this article, we’re going to show you how to mix techno music whether you make hard techno, melodic techno or anything in between.
The good news is, by learning some tricks from the pros, you’ll get your mixes sounding closer and closer to the real deal.
One of the biggest misconceptions about mixing is waiting until after finishing your track to start mixing. That means; until your sound design is on point and your track is arranged to perfection. The best mixing though happens before you even start mixing! We’ll get more into that later.
If you apply these tips while recording and designing sounds, you’ll save a ton of time and spare yourself the headache when mixing later.
Why do I need to learn how to mix?
Saving time on mixing means you’ll avoid listening to your project over and over until you wear your ears out. Yes, your ears get tired and you lose the ability to listen critically to your track. That means you won’t be making the best choices when mixing. You also run the risk of getting sick of your track and throwing it away before you finish.
Now, let’s get into learning how to mix techno like a pro!
Pro tip
What is mixing?
Mixing is the process of blending individual tracks in your project using tools like volume, EQ, compression, and effects to create a coherent and balanced sound. The rendered version of your track is called a mixdown, and it’s the mixing engineer’s goal to make the track sound as good as possible before handing it to a mastering engineer.
Mixing is about creating balance and harmony between the different elements in your track. Balance is the contrast between the loudness of instruments or sounds in a track and the elements of the groove—what sounds are in your face and which are in the background. It’s also the balance of high and low frequencies to shape the tone and overall feel of a track.
Having a balanced distribution of frequencies in your track is one of the elements that give your track that professional character. Roughly speaking, you want something resembling the Nike “swoosh” to get your mix to sound like a professional techno producer. Another key part of professional mixing is taming any harsh and unpleasant frequencies and carving out space for every instrument in the frequency spectrum.
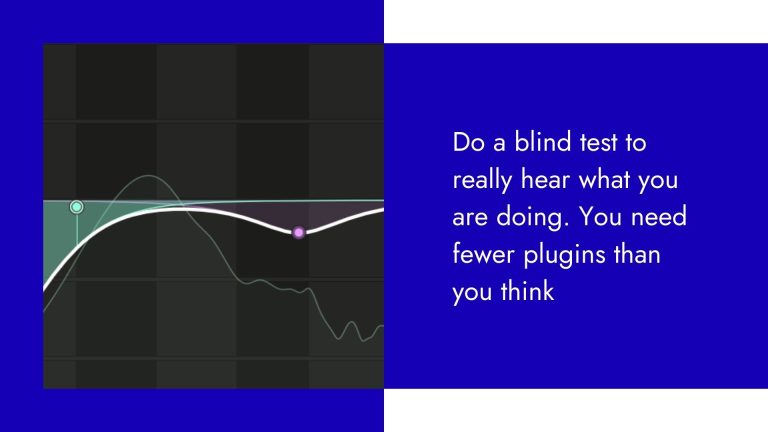
A/B test
Before and after mixing
Example 1 – Harder Techno
Let’s listen to a before and after example using all tips from this article.
Use headphones or studio monitors for best results to hear the differences between both versions.
Track: PLEASURES – Overconfidence
*click on “Before” or “After” button for A/B testing
What can we hear in the “Before” mixing version?
- The sound is already decent, but there’s room for improvement
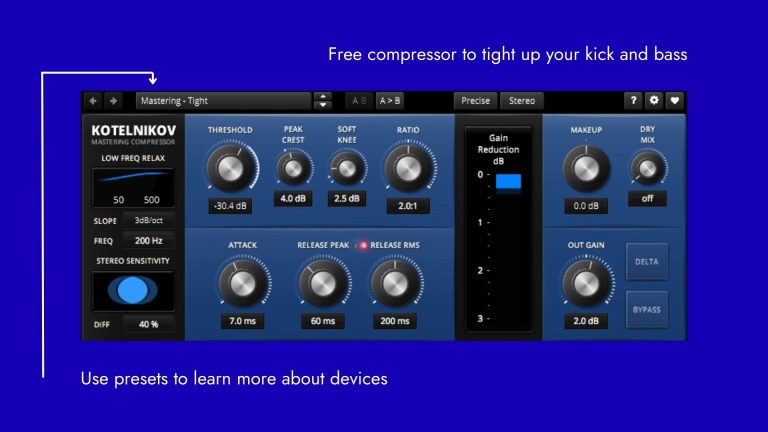
- The kick needs more presence (other sounds are masking it)
- The kick and bass need to be tighter
- The track could be more dynamic; with more space and clarity
What can we hear in the “After” mixing version?
- The kick is changed—there’s a cut around 200Hz, so it doesn’t sound so boxy
- The kick and bass are tight
- There is more clarity—each sound has more space
- The track is more dynamic
Have you noticed anything else? Let us know in the comments.
Pro tip
Check your references
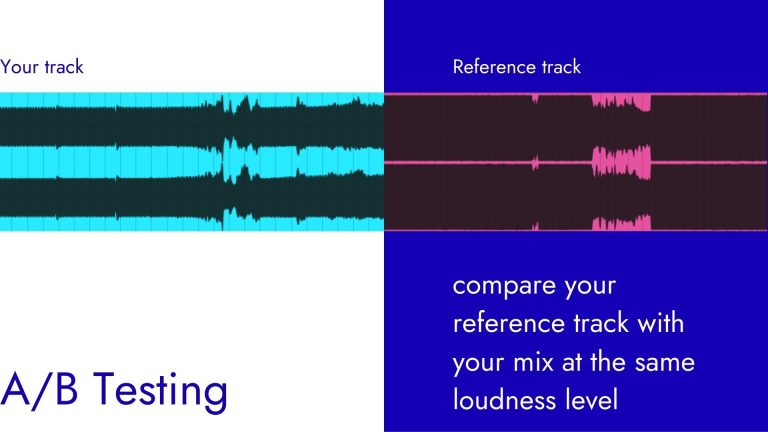
Painters often use photos and objects as references to get their proportions right and not miss any details they want to include in their paintings. Referencing in techno music works the same way. Almost every professional producer and engineer uses reference tracks and here’s why you should too.
Without a reference track, you’re making mixing decisions blindly if you don’t have a baseline to compare your mix to. Try drawing a person’s face from memory without looking at a photo. Pretty hard, right?
Unless you’re a gifted artist, your portrait probably looks like Mr. Potato Head, and that’s expected. You probably don’t want a Mr. Potato Head mix, so use reference tracks! A great place to start is using your favourite techno tracks as references.
Anytime you listen to a techno track and notice it has a thumping low-end or love how the hi-hats sit crisply on top of the mix; add it to your collection. You’ve got to listen to a lot of techno tracks made by pros to learn how to make techno like them.
By comparing your mix with a reference, you’ll be able to answer questions like:
- How loud should I set my kick?
- Why does my low-end sound boomy?
- Why aren’t my hi-hats punching through?
Put referencing tracks into practice
Try this exercise on your next project.
Drop an audio file into your project as your reference track (use a high-quality lossless format like .wav or .flac, if possible.) Next, adjust the volume to where it’s playing at the same level as your mix.
Remember: matching the volume of your track with your reference is crucial!
Open up a frequency analyzer and check if your sounds are hitting close to the same volume across the frequency spectrum as those in your reference track.
Say that you really like how the drums groove in one of your reference tracks. You’ll want to look at the levels and frequencies where your kick, snare and hats are hitting and adjust them to match your reference. Switch between listening to your track and your reference by soloing each to hear the differences and make any changes needed.
Pro tip
A/B test
Before and after mixing
Example 2 – Hypnotic Techno
Let’s listen to example 2 before and after using the techniques in this article.
Again, use headphones or studio monitors to hear the difference between the two versions.
Track: Michal Basar – Hypno Structures
*click on “Before” or “After” button for A/B testing
What can we hear in the “Before” mixing version?
- A classic example of an in-the-box sound; Sounds dull
- Muddy low-mids; track doesn’t breath
- The kick and bass need treatment
- The track could be more dynamic and brighter, and use more space and clarity
What can we hear in the “After” mixing version?
- Low-mid is cleaner; resonances in the 200-300Hz area attenuated
- The kick and bass are tight and more dynamic
- More brightness
- Every sound has more space, clarity, and overall every track sounds more alive
Have you noticed anything else? Leave us a comment at the end. 🙂
Tune your sounds
Tuning your sounds when producing can save you a ton of time when mixing. When you tune your sounds, your mix naturally plays tighter, because you’re making sure that sounds are sitting on top of one another, creating a feeling of oneness, rather than a clash of sounds fighting one another.
This is why using your DAW’s tuner or spectrum analyzer to check frequencies is so important. Transient sounds like kicks, snares, percussions and hats often don’t have a distinct pitch, so if a tuner doesn’t work, you can try an EQ with a visual spectrum analyzer to look for the biggest frequency peaks.
Then check for clashing frequencies among sounds. If two sounds occupy the same frequency band, try pitching one of the sounds up or down to give them room to breathe.
For example, if your kick is peaking at around 55Hz—your bass will complement the kick if it’s pitched an octave or two above, at 110Hz and 220Hz. If the fundamental was 55Hz, you could end up with a muddy low-end.
Like every rule in producing music, this one can be broken. Some producers don’t tune their instruments at all. Instead, they listen for frequency masking—where one sound blends with another in the same frequencies so your ear can’t make out which sound is playing. It’s a great skill to have, and we recommend you train your ear to listen for masking while also using tuners and spectrum analyzers to be sure.
Pro tip
Create a groove that makes you want to move
A groovy track is a dynamic one. Listen to the best techno tracks—notice how the track’s energy rises and falls, sounds move toward the inside of your speakers, then outside. There’s a contrast between sections and individual sounds creating a feeling of movement and progression, not just relentless pounding from your speakers throughout the track.
How to add dynamics to a techno track
An easy way to add dynamics is to vary the volume of instruments over time. You can’t have a loud part if every part is the same loudness, so try lowering the volume on tracks once in a while.
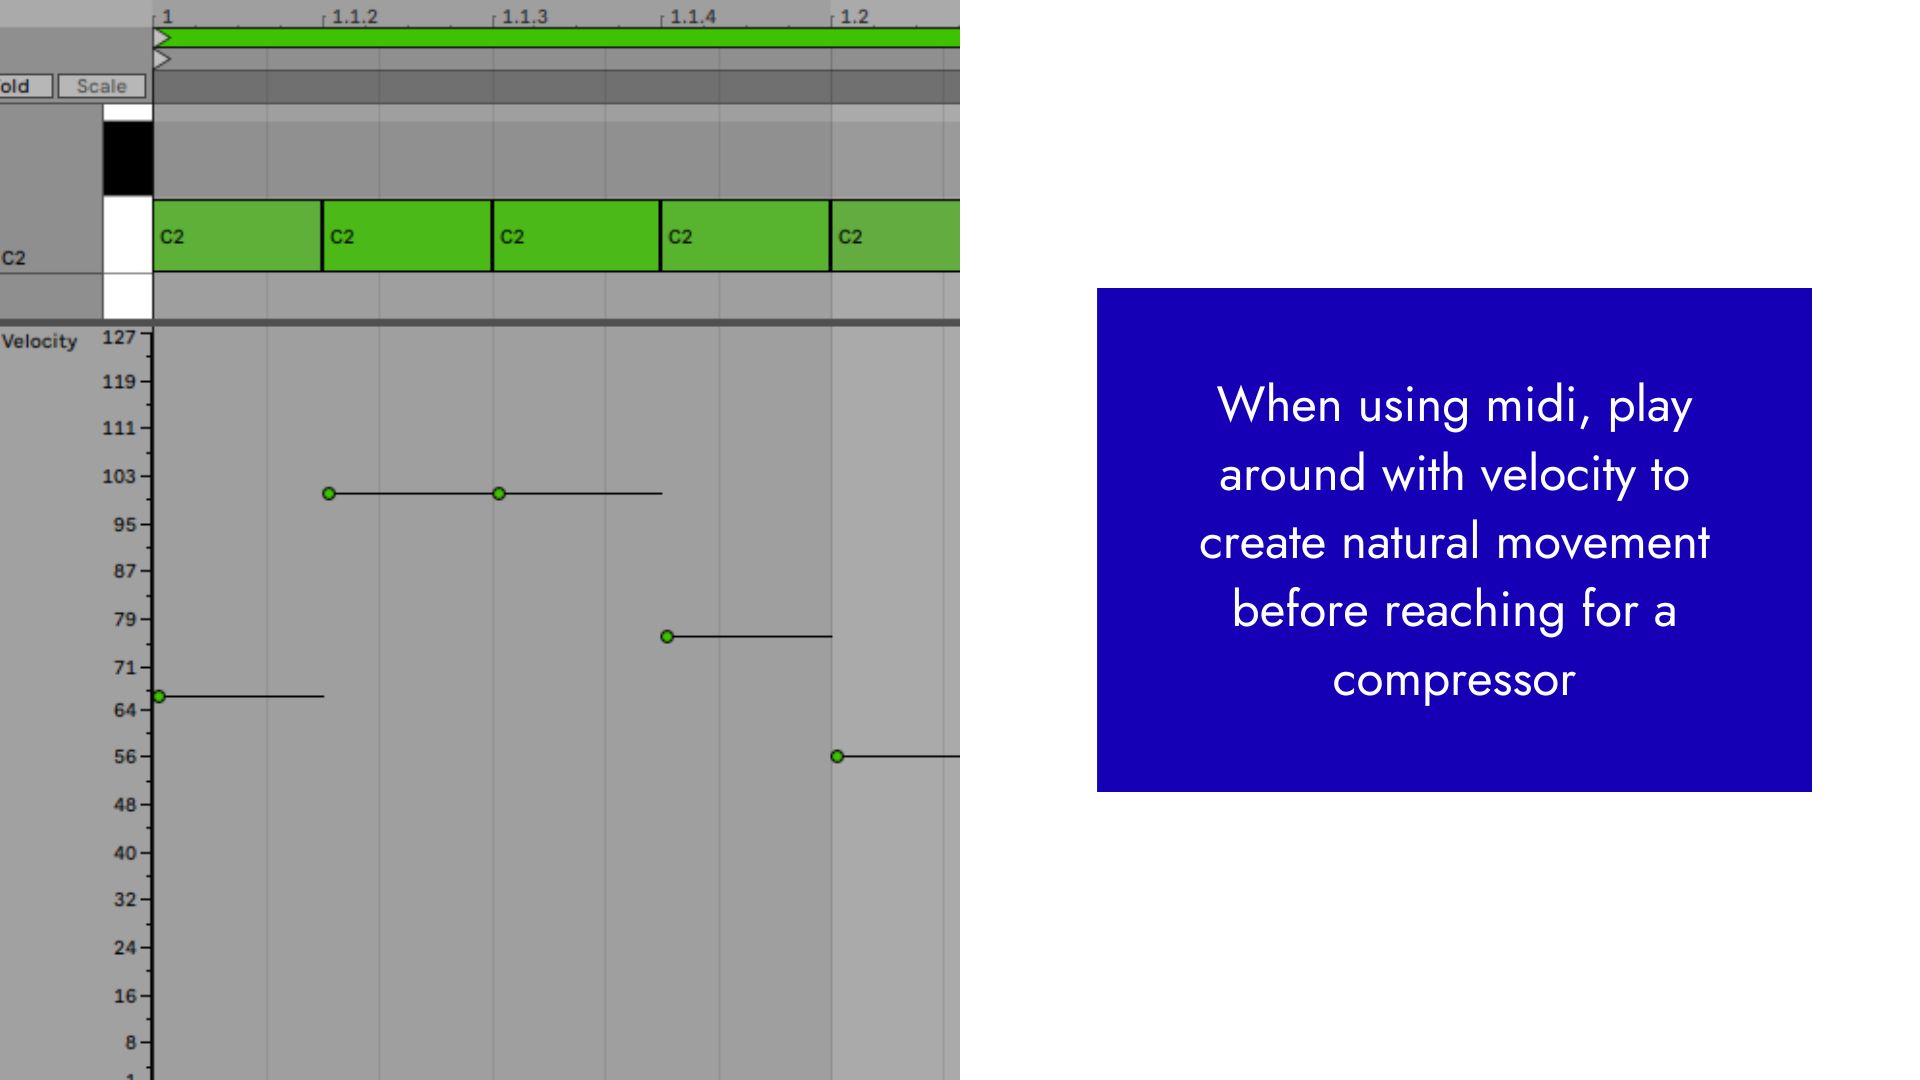
Another way to make your sound organic is by changing the velocity of notes in your midi tracks. Also, go easy on compression because too much can kill your track’s dynamics.
Another good place to start is using sidechain compression on your tracks. Sidechaining can create a pumping effect and give them some bounce.
What sidechain compression does is lower the volume of a sound, but only when another sound is playing. Sidechain compression is a great technique to control the loudness of instruments playing at the same time.
In techno music, since the kick is the most important to the track, it’s often the main sidechain input. However, techno wasn’t made by people following the rules so you should try out different sidechain inputs like a synth lead into a pad, or a vocal into a lead, and so on.
By sidechaining the lead to the kick, every time the kick hits the compressor activates, lowering the volume of the lead. As always, have fun with it and try different sidechain inputs to see how they can add dynamics to your track.
Pro tip
Place every instrument in its own space in the frequency spectrum
Every sound should have its own area in the frequency spectrum. The idea here is to create a good tonal balance between sounds by spreading energy evenly along the frequency spectrum. Decide what frequencies are most important for a sound and carve away unnecessary frequencies, so there’s no obvious clashing between sounds.
For example, you can freely cut low frequencies (<500Hz) on your hi-hats, or shelve high frequencies (>3000Hz) on your bass. They might not sound as rich on their own but listen to how they retain their character in the mix while allowing other instruments to cut through the mix. Cutting unnecessary frequencies from a sound that you can’t hear anyway will give you a clearer mix.
It’s up to you if you want to cut specific frequencies or lower the volume of the instrument, or both. Try each out and hear what works better. Reference tracks come in really handy here – use a reference to compare its frequency balance to your mix.
Pro tip
Get rid of resonant frequencies
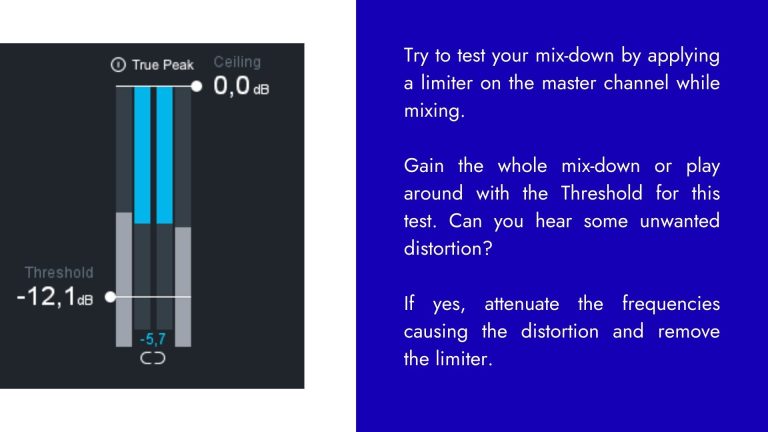
A resonant frequency is a troublesome, harsh-sounding frequency. When boosted with an EQ, these sound especially grating. You’ll want to cut those frequencies to stop your track from clipping or distorting in the mastering phase when the engineer pumps up the gain using limiters and other mastering tools.
It’s worth spending time looking for all those frequencies. Some of them you won’t even hear while listening to your track because other sounds are masking them. That’s why you should always check for resonant frequencies with each track in solo mode.
Where to look for resonant frequencies?
Every mix is different, so there aren’t any specific frequencies that will always be problematic, but we can give you some pointers.
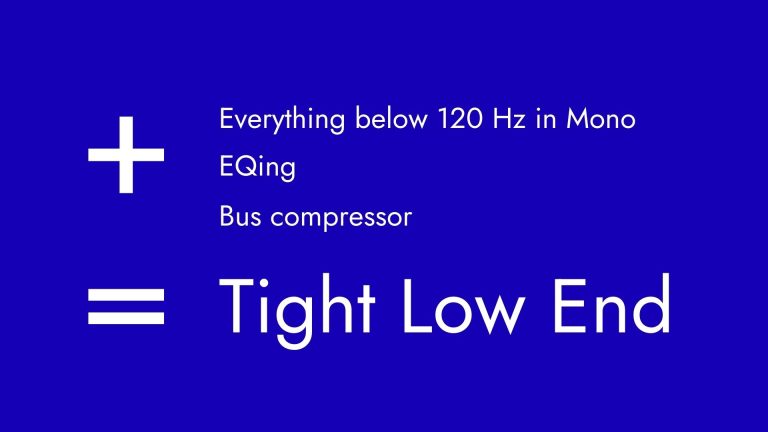
Low End
For the low end, 200-800Hz is a good place to check because many melodic elements will have their fundamental frequencies in this range and too much buildup here can create a muddy mix.
Mids
Look out for the 1-5kHz as the human ear is most sensitive here.
Highs
Hi-hats and cymbals, especially the popular 909 kits often have resonances in the 6-9kHz range.
While a professional mastering engineer can partly fix these problems, sometimes they can’t fix them completely. Getting rid of resonances in the mixing phase can save you time and money in the mastering phase.
Pro tip
Put every sound in its own space along the stereo field
A lot of mixing advice will tell you to keep the kick, bass, snare and vocals in mono panned in the center of your stereo field and to pan instruments around them. For mixing techno this is sound advice.
Making your main elements mono makes sure they’ll be reproduced faithfully on any sound system—especially on large club systems. A mono track sounds the same through one or two speakers. A stereo track will be summed together into mono when played through a single speaker.
What makes a track sound wide are phase differences between the left and right channels, but these frequencies can be troublesome when you sum them together. These frequencies can cancel out and take away the power of a track.
To make a sound wider, you can duplicate it and pan each left and right respectively. You can also use a stereo imager plugin or a delay plugin with a delay time below 30ms to get the Haas effect to get a wider stereo image.
Pro tip
EQing
- Make your track brighter and make space for frequencies.
- Boost higher frequency sounds with a high-shelf EQ. Remember, even dark techno and metal tracks sound open and bright when mixed and mastered. Listen to a reference track but don’t overdo it.
- Check again and again for harsh resonant frequencies that wear your ear out.
- Steer clear of mud. To add more definition to your mix, clear up frequencies around 200-300hz. Too much content in this range can cause muddiness. Pay extra attention to this area and cut out everything you don’t need. Keep in mind, that you can sometimes leave content here to keep the character of sounds intact. Find a balance between cutting problematic frequencies and keeping the sound authentic.
- Another problematic area is around 3000 Hz. Experiment with cutting frequencies here too.
These tips will help you even if you mix music on the cheapest of headphones or monitors.
Pro tip
Learn how to mix techno like a pro
We covered a few techniques producers use to make professional-sounding techno tracks. By applying these principles to your mix, you’ll be on your way to producing more polished, professional-sounding tracks. While it’s a long journey learning how to mix techno music, keeping these concepts in mind when you mix will give you a head start.
Sometimes you don’t know what’s missing from your mix. That’s where a trained set of ears can save you a lot of time and headache in figuring out how to fix it. You can reach out to producers and engineers you know, post on Reddit or Discord feedback threads or book a session with a professional mixing engineer to get tailored feedback (the first one’s free!).
If you think we should cover a topic you want to know more about, f0llow us and send a DM on Instagram.
Already a pro at mixing?
Aside from music courses and educational content, we provide industry-standard mixing and mastering services.
Submit your track to our in-house legendary mastering engineer Mattias Fridell.
Recap
There’s a lot to unpack about mixing in here, but let’s sum up what we’ve learned so far.
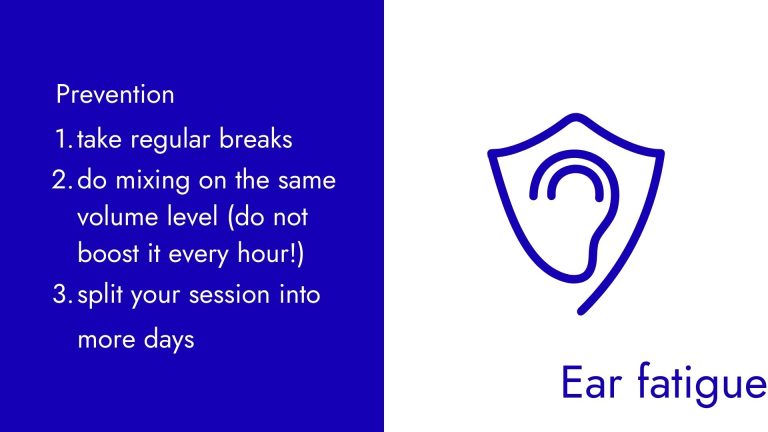
Ear Fatigue
- Take regular breaks to reset your ears
- Mix at the same volume level
- Split up your mixing sessions
What is mixing about
- Mixing is the process of blending individual tracks in your project using tools like volume, EQ, compression, and effects to create a coherent and balanced sound
- Fixing any harsh and unpleasant frequencies
- Preparing your track for mastering
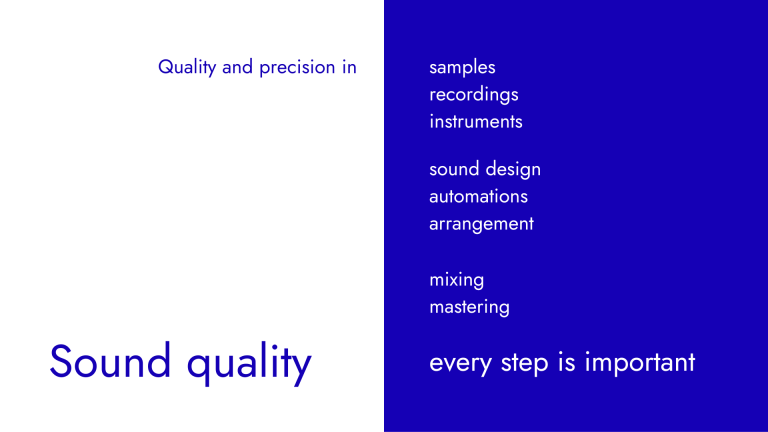
Sound quality
- Every step of production is important
Check your reference tracks
- Use a reference track to check the overall balance and clarity of your mix
- Matching the volume of your track and reference is crucial
- Use a frequency analyzer
- A/B test often
Tune your sounds
- Fine-tune instruments so your mix sounds tight
Create a groove; add dynamics
- Change up the velocity of sounds in the sound design phase, before reaching for a compressor
- Use automation to bring life and movement to your mix
- Use side-chain compression
Place instruments in their own space
- Place every instrument in its own space in the frequency spectrum using EQ, reverb, volume, and stereo imaging tools
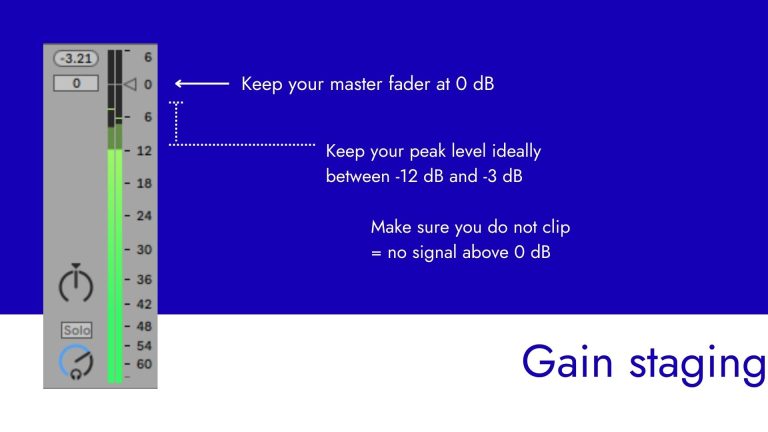
- Never, ever, EVER, clip the master channel!
EQing
- Clear mud around 300Hz
- Use EQ to create space for each instrument and fix any harsh frequencies
- Give your track brightness with enough high-end frequencies to avoid a dull mix
Subscribe for private tutorials, discounts and some additional good stuff
About the authors

Music producer making techno as DEKKI.

Mixing engineer, music producer, mentor